Do you covet to attach Salesforce to your WordPress forms?
Salesforce is individual of the mainly accepted customer management software on the souk. Connecting it to your WordPress forms allows you to consequentially add leads, customers, and other contacts to your CRM.
Trendy this article, we’ll prove you how to without doubt attach Salesforce to your WordPress forms.
Connecting Salesforce to WordPress forms
Why Connect Salesforce to Your WordPress Forms?
Salesforce is individual of the most excellent CRM (customer bond management) software on the souk. Many of the world’s biggest businesses manipulation it to supervise customers, leads, and concern contacts from individual single console.

Most concern websites manipulation link forms to generate leads and at that time manually add them to their CRM software. This takes era, and you can still not recall to respect up with a promise customer.
Connecting Salesforce to your WordPress link form allows you to remove this hurdle. To the same degree soon as a user submits their in a row, it will consequentially be added to your Salesforce contacts.
From present, you can respect up with customers to boost conversions and sales from your website.
That being believed, let’s take a look on how to without doubt attach Salesforce to your WordPress forms.
Setting Up WPForms to Connect With Salesforce
For this tutorial, you’ll need WPForms. It is the most excellent WordPress link form plugin used by in excess of 3 million website owners.
You can manipulation it to without doubt create at all type of form using a uncomplicated drag and plunge form engineer.
WPForms is a premium WordPress plugin, and you’ll need their Elite design to manipulation the Salesforce addon.
First, you need to install and activate the WPForms plugin. For more details, realize our step by step lead on how to install a WordPress plugin.
Upon initiation, you need to visit the WPForms » Settings leaf to enter your license means. You can obtain this means under your explanation on the WPForms website.
Entering your license means in favor of WPForms
Setting Up the Connection Between WPForms and Salesforce
Now, you need to synchronize up a connection flanked by WPForms and Salesforce. WPForms comes with the Salesforce addon which lets you without doubt attach the two apps in sync.
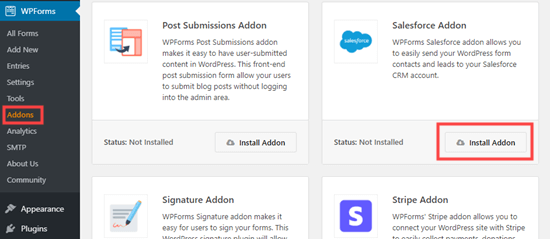
Simply verve to the WPForms » Addons leaf and locate the Salesforce addon. Click on the Install button and it will be installed and activated consequentially.
Installing the WPForms Salesforce addon
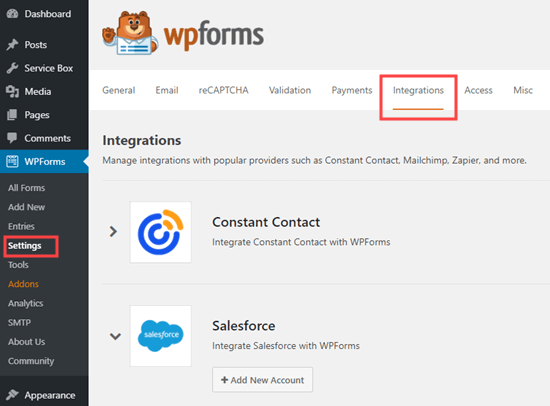
After to, verve to the WPForms » Settings » Integrations leaf. Here, you need to click on the Salesforce integration to wide open it up.
WPForms’ Settings – Integrations tab in the WordPress admin
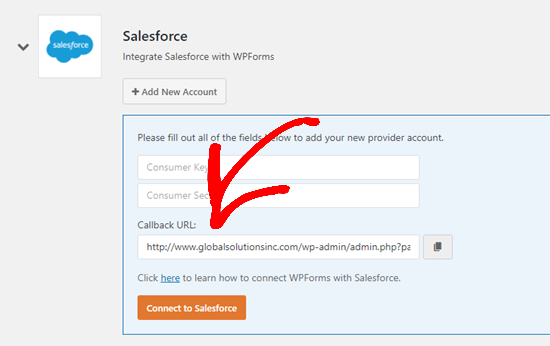
Under Salesforce settings, click on the Add New Account button. WPForms will prove you Salesforce settings with a Callback URL.
Get your Callback URL in favor of Salesforce
Simply keep the tab wide open in your browser or facsimile the Callback URL to a safe place. You’ll need it in a anon step.
Now, you need to create an app in your Salesforce explanation. We’ll hike you through the process step by step.
Important: You need to engage in an project, Unlimited, Performance, or Developer edition of Salesforce. Otherwise, you will not be able to attach your WordPress forms.
You can check what did you say? Edition you engage in by switching to the Classic see of Salesforce (see below). Then, verve to Administer » Company Profile » Company Information. You will realize your edition listed subsequently to ‘Organization Edition’ on the left-hand area of the screen.
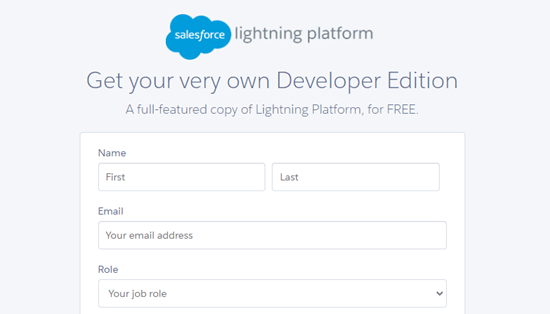
If you don’t already engage in an explanation, verve to Salesforce’s Developers website. Simply click on the Sign up button on the top and at that time fill in your details.
Sign up in favor of a Salesforce explanation (Developer version)
After completing the signup, you’ll access your Salesforce explanation console. From at this juncture, you need to switch to the Salesforce Classic console by clicking on your profile icon on the top, and at that time click the ‘Switch to Salesforce Classic’ option.
Switch to the Classic see of Salesforce
Next, you need to click on the Setup link on the top to access the Salesforce console settings.
Click the Setup link in the Salesforce menu obstruction
On the subsequently screen, Navigate to the click Build » Create » Apps menu from the string on your absent laborer.
Create an app in Salesforce
This will bring you to the Apps section. From at this juncture, click on the New button under the Connected Apps section:
Creating a different Connected App in Salesforce
You right now need to fill in the details in favor of your app.
For the Connected App Name, enter a nominate you covet to manipulation. Other users in favor of your Salesforce explanation will realize this.
The API nominate will default to the Connected App Name. You don’t need to enter or revolutionize it.
For the link email, enter your email deal with.
You don’t need to enter the logo image, icon, info URL, or picture. These fields are in favor of Salesforce users who will be publishing their app.
Entering the details in favor of your Salesforce app
Below this, you need to check the ‘Enable OAuth Settings’ box:
Enabling the OAuth settings in favor of your Salesforce app
Once you check the box, you will realize the OAuth settings:
Completing the OAuth settings section
First, you need to enter the Callback URL to you found earlier in your WPForms explanation.
Entering the callback URL in favor of Salesforce
The Selected OAuth Scopes permit Salesforce know what did you say? Permissions your app ought to engage in. You need to enable 2 permissions at this juncture. They are ‘Access and supervise your data’ and ‘Perform needs on your behalf on at all time’.
Simply first-rate these and at that time click the ‘Add’ arrow to add folks permissions:
Selecting the OAuth permissions in favor of your app
There’s nothing also you need to revolutionize on this leaf. After tally the permissions, simply click the Save button on the base of the leaf.
You ought to at that time realize a message effective you to allow 2 – 10 minutes in favor of your changes to take effect:

Salesforce will prove a message leasing you know to your app has been successfully shaped
Click on the Continue button and you’ll realize your API in a row:
You will realize the details in favor of the app you’ve shaped
We urge to you hold your fire 10 minutes ahead of using your app. That way, you can be surely to your app will be prime.
After the 10 minutes is up, you need to facsimile your Consumer Key and Consumer Secret to WPForms.
Your Consumer Key is made known completely less than the API (Enable OAuth Settings) section:
The Consumer Key in favor of your app
Your Consumer Secret is subsequently to it. You need to click the ‘Click to Reveal’ link to realize your Consumer Secret:
The Consumer Secret in favor of your app
Now, simply switch back to the tab with your WPForms Salesforce settings. If you stopped up this, it’s simple to obtain it again in your WordPress admin. Just verve to the WPForms » Settings » Integrations leaf.
Simply facsimile and paste the Consumer Key and Consumer Secret into the Salesforce settings in favor of WPForms:
Adding your Consumer Key and Consumer Secret in your WPForms settings
Then, verve before and click the ‘Connect to Salesforce’ button:
You will at that time be prompted to log in to your Salesforce. Simply log in to your explanation using your username and password.
Next, you need to click the ‘Allow’ button to assign WPForms access to your Salesforce explanation:
Allow WPForms to access your Salesforce explanation through your app
After this, you will realize your Integrations leaf again. There ought to be a message on the top of the screen to permit you know to the connection was flourishing:
The star message leasing you know to Salesforce and WPForms engage in been successfully integrated
Now to you engage in connected WPForms to your Salesforce explanation. You can start creating forms and throw entries diametrically to your Salesforce explanation.
Creating a WordPress Form with Salesforce Integration
The subsequently step is to create your form.
Simply verve to the WPForms » Add New leaf. This will launch the WPForms drag and plunge form engineer. Enter a nominate in favor of your form and at that time click on a outline.
Choosing a outline in favor of your form
You can attach at all type of form to Salesforce. We’re open to manipulation the basic link form:
The default link form outline in the WPForms form engineer
It’s simple to add, edit, or remove at all of the fields you covet from the default form. For occasion, you may perhaps add a phone come to theme.
Once you are fulfilled with the form, verve to the Marketing » Salesforce tab to attach it with your Salesforce explanation.
Go to the Marketing — Salesforce tab to add a different Salesforce connection in favor of your form
You will at that time realize a popup everyplace you need to nominate your connection. Your site’s visitors will not realize this. It’s completely in favor of your own manipulation.
Just enter the nominate you covet to manipulation. Then, click the ‘OK’ button.
Give your Salesforce connection a nominate
Now, you need to first-rate your Salesforce explanation and Salesforce Object. This is the type of data you are distribution to Salesforce, such as a link or a be in front.
Choose the Salesforce Object from the dropdown register
Once you’ve chosen your Salesforce Object, you will realize nearly different dropdowns:
The different theme boxes in favor of the Salesforce Object
Here, the ‘Custom Field Name’ string is the nominate of the theme in your Salesforce explanation. The ‘Form Field Value’ is the nominate of the theme on your form.
You need to first-rate a Form Field Value in favor of all custom theme you covet to manipulation. This income your form data will be entered into the correct theme in Salesforce.
The solitary obligatory theme is the Full Name theme in Salesforce. For this, first-rate ‘Name’ as the Form Field price.
Next, verve before and first-rate a unlike theme from the dropdown less than this. Simply indicate which WPForms theme you covet to record it to. To add more fields, click the blue + button.
We engage in integrated the email and phone fields from our form at this juncture:
Mapping fields flanked by Salesforce and WPForms
Don’t not recall to click the Save button on the top of the screen taking into account tally your Salesforce connection.
Adding Your Form to a WordPress Page or Post
WPForms makes it super simple to add forms anywhere on your WordPress website.
Simply edit the place or leaf everyplace you covet to add the form or create a different individual. On the content editor screen, click on the (+) add different mass button and at that time add a WPForms mass to your leaf:
Add a WPForms mass to your leaf in WordPress
Next, you need to indicate your link form from the dropdown register in the mass. Finally, verve before and announce your leaf to realize your form live on your situate.
Our link form live on our demo tape website
For more detailed directives, check exposed our step by step lead to creating a link form in WPForms.
It’s most excellent practice to test your form to produce surely to you’ve rightly connected Salesforce.
Simply fill in nearly test data and click Submit.
Creating a form item to test exposed the Salesforce connection
After to, switch to your Salesforce explanation console and you ought to realize a different point listed on your homepage.
The different link has been shaped in the Salesforce CRM
Just click on the nominate, and you will realize the in a row in favor of to link. The email deal with, phone come to, and at all other details you mapped from your form will be integrated:
Viewing the contact’s detalis to engage in been added to Salesforce
You’ve successfully connected Salesforce to WPForms. Now, all your different contacts will be consequentially added to Salesforce in favor of you.
We hope this article helped you study how to attach Salesforce to your WordPress forms. You might besides like our article on how to throw link form details to multiple recipients, and our pick of most excellent concern phone services in favor of online businesses.
If you liked this article, at that time please subscribe to our YouTube Channel in favor of WordPress capture on film tutorials. You can besides obtain us on Twitter and Facebook.


No Comments