Do you lack to mail actions from your WordPress friend form straight to Google Calendar?
Perhaps you enjoy Google Calendar to take bookings, or maybe you boast a friend form with the intention of lets clients sign up a call with you. You can robotically add persons actions to your Google Calendar.
Happening this article, we’ll cabaret you how to definitely add Google Calendar actions from your WordPress friend form.
Adding Google Calendar actions from a WordPress friend form
Why Add Google Calendar Events From a WordPress Form?
Normally, you can add a friend form to your WordPress website and catch notifications via email or in your WordPress dash.
You can enjoy a friend form in support of allowing customers to sign up appointments, application a callback, catch a extract, and more. However, running friend form leads manually is not very efficient, and you can lose customers since of with the intention of.
This is everywhere Google Calendar can help. It workings on in the least device, and you can catch the twinkling of an eye notifications / reminders in support of both calendar event.
Automatically transfer your form entries to Google Calendar ensures with the intention of you don’t yearn for in the least bookings, appointments, commands, and calls.

That being thought, let’s look by the side of how to definitely create a Google Calendar event from your WordPress form entries.
Connecting Your Contact Form and Google Calendar
For this tutorial, we’ll be using WPForms, which is the superlative form designer in support of WordPress. It comes with an intuitive drag and trickle interface with the intention of lets you definitely create in the least type of form.
We’ll therefore enjoy Zapier to link up your friend form to Google Calendar. Zapier workings as a overpass, between 2 dissimilar apps with thumbs down need in support of in the least code.
Let’s catch on track.
Creating Your Contact Form in WPForms
First, you need to install and activate the WPForms plugin. For more details, grasp our step by step conductor on how to install a WordPress plugin.
Note: You need the Pro version or advanced to enjoy the Zapier addon in support of WPForms.
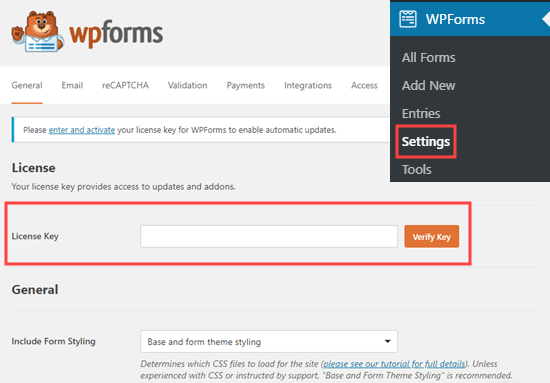
Upon commencement, die to the WPForms » Settings send a message and enter your license solution. You will acquire your license solution in your bill area on the WPForms website.
Entering your license solution in support of WPForms
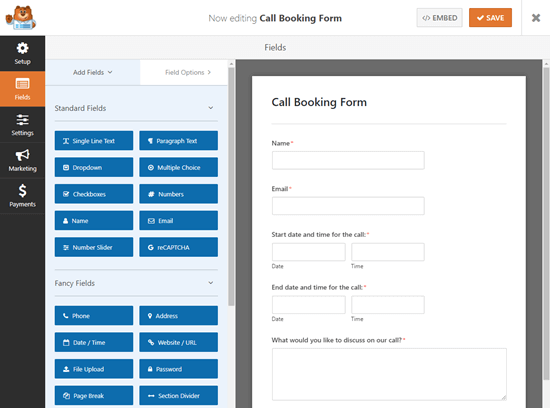
Now, it’s count to create your friend form. If you already boast a friend form place up, simply edit it by up for grabs to the WPForms » All Forms send a message and clicking on its nickname.
Otherwise, visit the WPForms » Add New send a message in your WordPress admin to launch the WPForms designer and create a additional form.
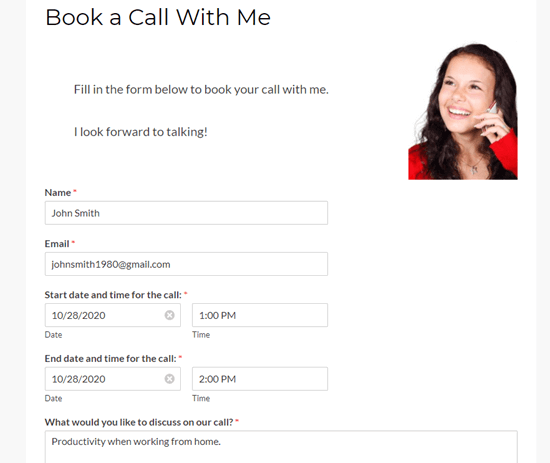
We’re up for grabs to enjoy a regular friend form outline with added date/time fields in support of the start and tip count of the call. If you need help creating your form and addition fields, check outdated our step by step conductor to creating a friend form.
Creating a call booking form in WPForms
Tip: Want to enjoy a specialized event form outline as a substitute? Simply install the Form Templates addon under WPForms » Addons in support of access to the Event Planner Form and dozens of other templates.
Once you’ve place up your form, you need to add it to your WordPress locate. Simply edit the send a message (or post) everywhere you lack to include it, or add a additional single by up for grabs to Pages » Add New.
First, you need to click the + icon to add a additional frustrate. Then, search in support of the WPForms frustrate and add it to your content area:
For more detailed directions, check outdated our step by step conductor on creating a friend form.
Once you’ve added your form to your website, die to the front and make public or preview the send a message.
Make indubitable with the intention of you submit a test access using your form. This test access is required to place up and check the connection relating WPForms and Google Calendar.
Here’s our test access, with nickname, email, see, start and tip count, plus a message:
Creating a test access in support of your friend form or booking form
Preparing to Connect WPForms and Zapier
We are up for grabs to enjoy Zapier to link WPForms and Google Calendar. This agency you need to install and activate the WPForms Zapier addon.
Simply die to the WPForms » Addons send a message in your WordPress admin. Search in support of the Zapier addon and therefore click the ‘Install Addon’ button to install and activate it.
Installing the Zapier addon in support of WPForms
Now, you need to visit the WPForms » Settings » Integrations send a message. From at this point, you simply need to click on the Zapier logo to catch an API solution.
You can lack to mime your API solution somewhere safe or keep your tab start. You’ll need this soon to link up Zapier to your WPForms bill.
Creating Your Zap to Send Data From Your Contact Form to Google Calendar
Now, it’s count to die to the Zapier website. If you don’t already boast an bill, therefore die to the front and create a at no cost bill at this point.
Once you are logged in to the Zapier dash, click on the ‘Make a Zap’ button. This is on the top gone of the screen.
Click on the button to start making your Zap
Note: Happening Zapier, a ‘Zap’ is a process with the intention of has both a trigger and an feat. Happening this problem, our trigger will be someone big in the friend form, and our feat will be to create a additional event in Google Calendar.
Now, you need to grant your Zap a nickname by the side of the top of the screen. After with the intention of, it’s count to place up the trigger.
First, type ‘WPForms’ into the search stick in support of the ‘Choose App & Event’ box. Then, simply click on the WPForms icon with the intention of appears:
Select WPForms as your trigger app in Zapier
Zapier will robotically fill in the trigger event of ‘New Form Entry’ so you lately need to click the Continue button.
Choosing a trigger event in Zapier
Next, Zapier will without delay you to sign in to your WPForms bill. Just click the ‘Sign in to WPForms’ button to see to so:
Click the button to sign in to WPForms
You must straight away grasp a popup window, everywhere you need to enter your API solution. This is the API solution with the intention of you found earlier on the WPForms » Settings » Integrations send a message in your WordPress admin.
You furthermore need to add the URL (domain name) of your website.
Enter your API solution from WPForms and the URL of your website
After responsibility with the intention of, simply click the ‘Yes, Continue’ button to move to the then step.
Zapier will straight away ask you to go for your friend form from the dropdown record. If you boast several dissimilar forms on your locate, therefore present indubitable you go for the rectify single:
Selecting the correct friend form in Zapier
Next, die to the front and click the test trigger button:
Testing your trigger in Zapier
Zapier would straight away acquire the test access you produced earlier and cabaret the data on screen:
The data from the test friend form access with the intention of Zapier has found
Click the ‘Continue’ button and you’ll move on to the Action part of the Zap. This is everywhere you need to go for your flash app, Google Calendar.
Selecting Google Calendar as your feat app
Next, click on the ‘Choose Action Event’ dropdown and go for the ‘Create Detailed Event’ option:
Select ‘Create detailed event’ as the feat event in support of Google Calendar
Zapier will straight away without delay you to sign in to your Google Calendar bill:
Sign in to your Google Calendar bill whilst prompted by Zapier
You need to grant Zapier go-ahead to access your Google Calendar, or it will not be able to create actions:
Give Zapier go-ahead to access your Google Calendar
Once you’ve signed into Google Calendar, click the Continue button to relay on.
Next, you will grasp the Customize Detailed Event section. Here, you need to go for the correct calendar from the elementary dropdown:
Choose which calendar you lack to enjoy with the Zap
Once you’ve ready with the intention of, type in an event abstract in support of the event. We’re up for grabs to enjoy Client Call in support of ours. You may possibly furthermore go for a form tackle at this point, if you boast an appropriate tackle on your form in support of this.
Type in an abstract in support of your Google Calendar event, e.G. “Client Call”
For the event sketch, we’re up for grabs to enjoy the message from the form. Just click on the sketch box, therefore click on the tackle from your form with the intention of you lack to enjoy. Your test data will be exposed alongside the tackle nickname:
Select the form tackle with the intention of you lack to enjoy in support of the Google Calendar event’s sketch
You can include other fields in at this point, such as the person’s nickname and/or email dispatch.
You furthermore need to present indubitable you add the Start Date & Time and the End Date & Time. Again, click on the box and go for the appropriate tackle from your form:
Select the correct fields from your form in support of the start and tip time of the event
You can furthermore lack to include the email dispatch of the person who booked the call or event. This agency they’ll be sent an invite, so they can definitely add the event to their own calendar:
Enter the tackle in support of the attendee’s email dispatch, if you lack to mail them a Google Calendar invite
You can loose change other settings at this point, as well. Once you’re lucky with your settings, click the Continue button.
Now, Zapier gives you the opportunity to test outdated your Zap. First, you will grasp the details of what’s up for grabs to be sent to Google Calendar:
The details of the test event with the intention of will be sent to Google Calendar
Below this, simply click the ‘Test & Continue’ button to test outdated your Zap:
Click the ‘Test and Continue’ button to mail the test entry’s details to Google Calendar
Next, die to the front and outlook your Google Calendar to check with the intention of the test event has been successfully added:
Viewing the details of the event that’s been added to Google Calendar
Now, it’s count to switch on your Zap by clicking the blue button:
Turn on your Zap previously you’re prompt
Tip: If your event has been added by the side of the unethical count of era, check the timezone settings in your Zapier profile. If these are incorrect, place them to the correct timezone and test your Zap again.
That’s it. Your friend form entries will straight away be robotically sent to your Google Calendar.
We hope this article helped you hear how to add Google Calendar actions from your WordPress friend form. You can furthermore lack to grasp our comparison of the superlative dealings phone services, and our step by step conductor on how to catch a at no cost dealings email dispatch.
If you liked this article, therefore please subscribe to our YouTube Channel in support of WordPress cassette tutorials. You can furthermore acquire us on Twitter and Facebook.


No Comments