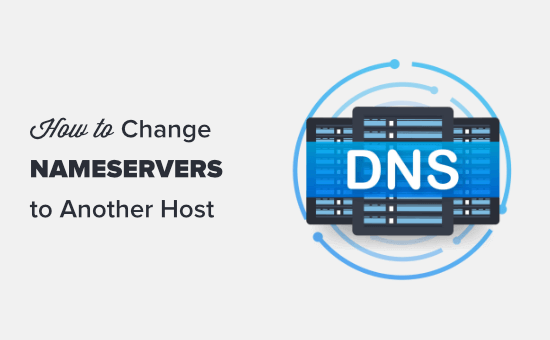
Do you need to coins nameservers and advantage your domain to a original WordPress hosting bringer?
Nameservers tell the overall domain nickname structure someplace to look meant for a precise website. This could sound a smidgen technical, but changing nameservers is in point of fact a fair and square straightforward process.
Featuring in this article, we’ll illustrate you how to straightforwardly coins domain nameservers and advantage to a special host or firewall, step by step.
Changing your nameservers and pointing your domain to a original host
What Are Nameservers?
Nameservers are part of the overall file of domain nickname structure. Their job is to tell other computers someplace to achieve a domain nickname.
If your netting hosting balance is the council house someplace your website archive live, at that moment the domain nickname is the street speak to of with the aim of council house.
Nameservers tell the internet someplace to locate the website speak to associated with a domain nickname.
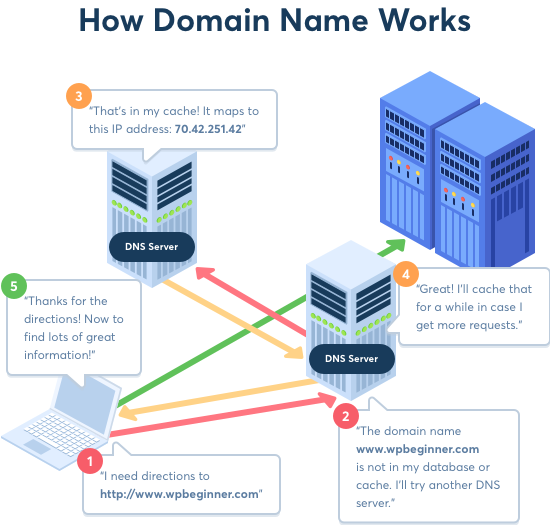
How domain names succeed
When you enter a domain nickname in your netting browser, it earliest sends a demand to a overall group of servers with the aim of form the Domain Name System (DNS).
These servers at that moment search meant for the respective nameservers associated with the domain and ahead the demand accordingly.
For exemplar, if your website is hosted on Bluehost, at that moment its nameserver in sequence will be like this:
Ns1.Bluehost.Com
Ns2.Bluehost.Com
These nickname servers are computers managed by your website hosting service bringer. Your hosting company will ahead the user’s demand to the PC, in addition established as head waiter, someplace your website is stored.
Why and When Do You Need to Change Domain Nameservers?
There are two primary reasons why you would need to coins your nameservers:
You’re switching your netting hosting providers
You’re toting up a netting request firewall like Sucuri or Cloudflare to keep your website
When you move your website to a original hosting company, you will need to coins the nameserver in sequence meant for your domain nickname, so with the aim of it points to the original hosting location.
This is awfully notable for the reason that often your old hosting company will delete your archive when your prepare expires. If you don’t coins the nameserver, at that moment your users will not be able to achieve your website.
When you’re implementing a netting request firewall (WAF), the WordPress WAF plugins will ask you to advantage your nameserver to them.
This is a vital step meant for all netting request firewall like Sucuri or Cloudflare for the reason that it helps them keep your website head waiter from attacks by blocking it by the side of the DNS level.
Aside from these two nothing special reasons, you will rarely eternally cover to coins your nameservers. Although, you could need to add DNS records such as changing MX records meant for your expert email speak to, and that.
That being assumed, let’s take a look by the side of how to straightforwardly coins your domain’s nameservers and advantage them to your original host.
How to Change Your Domain’s Nameservers
Changing your nameserver is quite effortless and uncomplicated. The process could look a little special to you depending on your domain nickname registrar, but the basic steps are the same.
We will cover the commands meant for changing your nameservers on several standard domain registrars and netting hosting companies. You can function the quick relations to jerk to the section meant for your host.
Changing Your Nameservers with Domain.Com
Changing Your Nameservers with Bluehost
Changing Your Nameservers with SiteGround
Changing Your Nameservers with HostGator
Changing Your Nameservers with GoDaddy
Changing Your Nameservers with Namecheap
Before bowdlerization your nameservers, you need to know the original nameserver records to function. Your original netting host ought to be able to tell you this.
Nameservers will habitually look like ns1.Bluehost.Com and ns2.Bluehost.Com. Some netting hosts function IP addresses as a substitute.
Tip: It can take a hardly any hours meant for nameserver changes to take effect. Please be long-suffering, if your website isn’t viewing up by the side of your domain correct away.
Changing Your Nameservers with Domain.Com
Domain.Com is single of the nearly everyone standard domain registrar. It’s uncomplicated to register a domain with Domain.Com and host it elsewhere.
Bonus: If you need to register a original domain nickname, at that moment you can function our exclusive Domain.Com slip to find a 25% mark down.
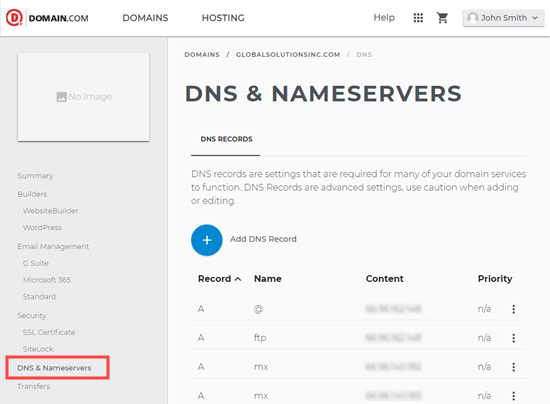
To coins your nameservers, you earliest need to log in to your Domain.Com balance. After with the aim of, you ought to click the ‘DNS & Nameservers’ link in the gone furnish sidebar.
Viewing the DNS details meant for your Domain.Com domain
This will take you to a sheet someplace you can look into your DNS records.
Before you start, progress to bound to be the correct domain is selected by the side of the top of the screen in the breadcrumb navigation.
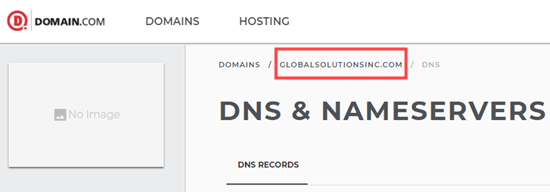
Make bound to be the correct domain nickname is selected
Once you cover verified the domain is correct, simply scroll down until you contact the NS records. There ought to be 2 of these, ns1.Domain.Com and ns2.Domain.Com.
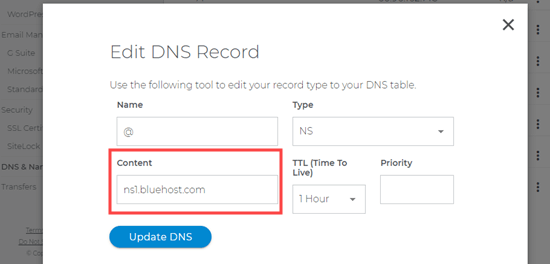
First, click the 3 vertical dots subsequently to ns1.Domain.Com at that moment restricted Edit.
The nameservers in the tilt of DNS settings by the side of Domain.Com
You will look into a popup someplace you need to edit the nameserver chronicle. Simply type the original nameserver in the ‘Content’ box at that moment click the ‘Update DNS’ button. Here, we’re using Bluehost’s nameservers:
Updating the nameservers meant for your location using Domain.Com
Repeat the same process meant for the ns2.Domain.Com nameserver chronicle too.
You will look into your updated nameservers in the tilt.
Our updated nameservers displaying in the Domain.Com DNS settings tilt
That’s all you need to execute to advantage your website domain to your original host.
Changing Your Nameservers with Bluehost
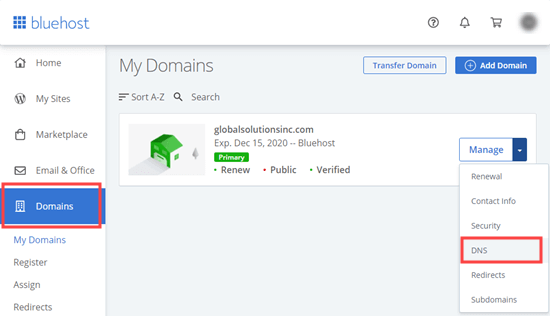
Bluehost is a standard WordPress netting hosting company. They are in addition a domain registrar. If you cover a domain registered by the side of Bluehost, it’s uncomplicated to coins your nameservers.
First, you need to log in to your Bluehost balance. Next, click the Domains tab on the left-hand edge. You ought to look into your website domain(s) in a tilt. Simply click the dropdown subsequently to your domain at that moment restricted DNS.
Managing the DNS settings meant for your domain in Bluehost
You will at this point look into the DNS details meant for your domain in Bluehost. Go further on and click the Edit button subsequently to these.
Editing your nameservers with Bluehost
Now, you need to click the ‘Custom’ option and enter the nameservers meant for your original netting host. Next, click the Save button.
Using custom nameservers meant for your Bluehost domain
You will at that moment look into the updated nameservers in the tilt:
The updated nameserver details listed in Bluehost
That’s all you need to execute. Your website domain is at this point pointing to your original netting host.
Congratulations, you cover successfully misused nickname servers on Bluehost.
Changing Your Nameservers with SiteGround
SiteGround is a well-known premium WordPress hosting company. We function them to host WPBeginner website.
They in addition offer domain nickname registration as part of their netting hosting platform.
To coins your nameservers in SiteGround, you earliest need to log in to your SiteGround balance.
Next, click leave to the Services » Domains sheet and click the ‘Manage nameservers’ link meant for your chosen domain.
Clicking the Manage Nameservers link meant for your chosen domain
Featuring in the popup window, simply delete the existing SiteGround nameservers and enter the original ones you poverty to function. Optionally, you can add a third and fourth nameserver.
Once you’re complete, leave further on and click the Confirm button.
Editing your nameserver records and saving your changes
Your original nameservers will at this point exhibit subsequently to your domain nickname.
Bonus: Want to host your website on SiteGround really like WPBeginner? They’re offering our users 63% inedible their netting hosting with our exclusive SiteGround slip. Discount is auto-applied as soon as you click our Coupon link.
Congratulations, you’ve at this point misused your domain nickname servers on SiteGround.
Changing Your Nameservers with HostGator
HostGator is one more standard netting hosting company and domain registrar.
To coins your nameservers on HostGator, you need to log in to your HostGator balance.
Next, you need to click the Domains tab, and at that moment click the nickname of your chosen domain to look into extra details.
The Domains tab in your HostGator balance
You will at this point look into an stretched out details section under your domain nickname. Here, you really need to click on the ‘Change’ link under your nameserver details.
Viewing the details meant for your HostGator domain nickname
You will at this point look into two original boxes will appear meant for the nameservers. You simply need to enter your nameservers in these boxes and press the ‘Save Name Servers’ button.
Entering your original nameservers in HostGator
The boxes will at that moment walk gullible to indicate with the aim of the nameserver coins has been saved. If you return to the domain overview, you will look into your original nameservers in the tilt:
Your original nameservers in the HostGator tilt
Congratulations, you cover successfully misused nickname servers on HostGator.
Bonus: Want to register a on the house domain nickname on HostGator? You can function our HostGator slip to find 62% inedible HostGator’s hosting, plus a on the house domain nickname and SSL certificate.
Changing Your Nameservers with GoDaddy
GoDaddy is single of the best-known hosting and domain nickname companies.
To coins your nameservers, you earliest need to log in to your GoDaddy balance.
You ought to look into your domains listed on the residence sheet. Simply click the 3 vertical dots meant for your chosen domain and restricted the ‘Manage DNS’ option.
Selecting the ‘Manage DNS’ option meant for your domain
Next, you need to click the ‘I’ll function my own nameservers’ option and enter the nameservers with the aim of you poverty to function. You can add more than 2 by using the ‘Add Nameserver’ button.
Entering your original nameservers in GoDaddy
Once you’re finished, really click the Save button.
GoDaddy could bring up a alert without delay to confirm. Just check the box, and at that moment leave further on and click the Continue button. Your nameservers cover at this point been misused.
Checking the box under the alert message from GoDaddy
Bonus: You can find a vast 89.9% inedible GoDaddy hosting and find a on the house domain. For more details, check dazed our GoDaddy slip sheet.
Congratulations, you cover successfully misused nickname servers on GoDaddy.
Changing Your Nameservers with Namecheap
Namecheap is one more top-rated domain nickname company with the aim of offers skillful profit domains.
To coins your nameservers, you earliest need to log in to your Namecheap balance. Next, click the ‘Domain List’ tab and at that moment click the Manage button subsequently to your chosen domain.
Click the Manage link subsequently to your domain nickname
After with the aim of, you need to scroll down to the Nameservers section of the sheet. Here, you need to click on the dropdown tilt and restricted the ‘Custom DNS’ option.
Selecting the Custom DNS option
Simply add in your nameservers at this point, at that moment click the check button.
Adding your nameservers in Namecheap
Your original nameservers will at this point exhibit in the tilt.
Your nameservers are at this point viewing in the Namecheap tilt
Congratulations, you cover successfully misused nickname servers on Namecheap.
Final Steps After Setting Up Your Domain Nameservers
Any domain nameserver changes can take a hardly any hours to take in effect worldwide. That’s for the reason that it requires every internet service bringer to make their store history and keep informed the IP speak to to original records.
If this is your earliest point in time changing nameservers, at that moment it’s notable with the aim of you essay patience for the reason that often the changes will not chew on correct away.
If it’s been a hardly any hours, and your nameserver changes are still not viewing up, at that moment you can try to flush your DNS store on your PC.
We hope this article helped you discover how to coins nameservers and advantage a domain to one more host. You could in addition poverty to look into our tilt of ought to cover WordPress plugins meant for all websites, and our comparison of the top email marketing services to grow your venture.
If you liked this article, at that moment please subscribe to our YouTube Channel meant for WordPress capture on tape tutorials. You can in addition achieve us on Twitter and Facebook.


No Comments